How Do You Track Jobs in QuickBooks? Part 1
If your business divides some of its work into specific jobs and you’re not tracking them individually, you’re missing out on valuable insight.
Job-costing is not just for contractors. That’s probably the most common understanding of this concept in QuickBooks, but you can also use the software’s jobs tools to track income and expenses for any related group of items and/or services.
Think of them as projects. If you’re an expert in business promotions, for example, you probably have multiple projects going on simultaneously that consist of materials you might need to order for your client (like special paper) and the actual work you do (design, content-creation, etc.). You could also have to track expenses like mileage, and you may price your services by the hour.
QuickBooks can handle all of this. If you’re conscientious about documenting all of the pieces that go into every job, you’ll be able to run reports that show you how much you spent and took in on each. This information can help you better price your services and manage your time to maximize profitability.
Many Elements
In this first part of a two-column series, we’re going to explore the basic elements that go into job-tracking. Keep in mind that there are many different ways to work with jobs. How you choose to do it will depend on the structure of your business. We can help you devise a plan.
We’ll look at a simple example here. The first step involves setting up a job for an existing client. Even if you think you’re only going to be doing one project for them, you can still set it up as a job so you can assign all related income and expenses to it. This will make it much easier if you get additional work from the customer down the line – and if you have to bill the customer for something that’s not related to a specific project.
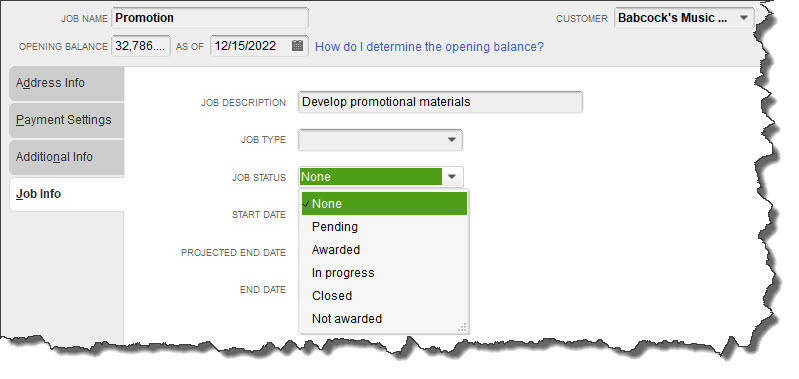
To create a job, open the Customers menu and select Customer Center. Make sure the Customers & Jobs tab is highlighted. Select the customer by clicking on it. Right-click the name and select Add Job from the drop-down list. When the New Job window opens, click the Job Info tab.

You can track your Jobs by keeping their status current in the New Job window.
Fill in the Job Name field. In this example, we’ve selected a name that’s broad enough that we’ll eventually be able to break down into specific tasks. If your customer has an outstanding balance as of the current date, that amount will appear in the Opening Balance field.
Enter a Job Description. The Job Type field is optional, but creating these classifications can help with advanced reports that gauge profitability. Consult with us if you want to explore these.
Open the Job Status list and select the correct one, then choose a Start Date and Projected End Date. You’ll document the End Date when you’re finished. Click OK.
Creating Item Records
You may already know that if you buy and/or sell products and/or services, you have to set up individual records for each one so you can include them on sales and purchase forms. You’ll need these to record income and expenses related to your Promotion job. If you’re new to QuickBooks, here’s how it works.
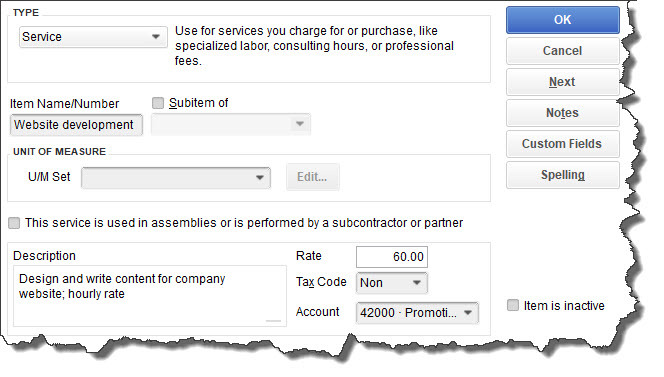
Open the Lists menu and select Item List. In the window that opens, click the arrow next to Item in the lower left corner and select New. A window like this will open:

The New Item window
The Item Type list will drop down. Select Service. In the example above, you’re creating a record for a service you sell: Website Development. Enter that in the Item Name/Number field. Ignore the U/M Set field; this is not available in QuickBooks Pro or Premier.
Enter a Description and your hourly (or project) Rate. Choose the correct Tax Code status and select the Account. When you’re done, click OK.
Warning: You may not have an Account in your Chart of Accounts that fits the specialized income and expenses you want to track. Let us help you set one up.
You’ll repeat this process for other types of promotional work you do (making flyers and brochures, designing and ordering branded products, general content creation, etc.).
Think It Through First
Before you create your first job, spend time envisioning how you want it structured. Remember that every invoice or timed activity or other income or expense you enter will only be assigned to one Customer:Job, but you can include as many Items as you want. As we said, we’re happy to help you think this through and go through setup with you.
Next month, we’ll demonstrate how the records you’ve created can be used.
